
How to Connect PC Gaming Headphones to a Desktop or Laptop When it comes to immersive gaming, high-quality headphones play a vital role in enhancing the experience. Whether you’re playing competitive first-person shooters or enjoying story-d riven adventures, the right gaming headset ensures crystal-clear sound, team communication, Best Gaming Headphones Under 50 Dollars
and overall comfort. However, many gamers often wonder how to properly connect their PC gaming headphones to a desktop or laptop. The process may vary slightly depending on the type of headset you own, but with the right steps, setup is simple and hassle-free.
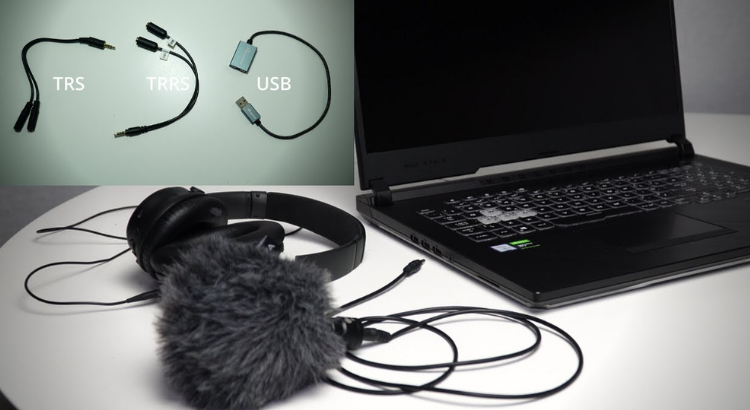
## 1. Identify Your Headphone Type
Gaming headphones come in different connection types—wired (3.5mm audio jack or USB) and wireless (Bluetooth or USB dongle). Before setting up, check your headset’s compatibility with your device. Most desktops and laptops support both wired and wireless connections, but some may require specific drivers or adapters.
## 2. Connecting Wired Headphones via 3.5mm Jack
If your headphones use a standard 3.5mm audio jack, you’ll usually find two options: a single jack for combined audio/microphone or separate jacks for each function.
* **Single Jack (Combo Port):** Simply plug the headset into the headphone/mic port.
* **Dual Jacks:** Connect the green cable (audio) to the headphone port and the pink cable (mic) to the microphone port. Some laptops may require a Y-splitter cable if they only have a single port.
## 3. Connecting Wired Headphones via USB
USB gaming headsets are plug-and-play, meaning they’re easy to set up. Just connect the USB cable to an available port on your desktop or laptop. The system should automatically detect the device and install any necessary drivers. For additional features like surround sound, you may need to install the headset’s companion software.
## 4. Connecting Wireless Headphones via Dongle
Most wireless gaming headphones come with a USB dongle for stable, low-latency connections. Insert the dongle into your desktop or laptop, power on your headset, and it should connect automatically. For the best performance, ensure the dongle is inserted directly into the computer rather than through a USB hub.
## 5. Connecting Wireless Headphones via Bluetooth
If your gaming headphones support Bluetooth, enable Bluetooth on your laptop or desktop. Put the headset into pairing mode, select it from the available devices list, and complete the connection. While convenient, Bluetooth may not always provide the same low-latency experience as a dedicated dongle.
## 6. Adjusting Sound Settings
Once connected, configure your audio settings for the best performance:
* On **Windows**, right-click the sound icon, select *Sound Settings*, and choose your headset as the default input/output device.
* On **Mac**, go to *System Preferences > Sound* and select your headset.
For advanced headsets, use their dedicated software to adjust equalizer settings, surround sound, or microphone sensitivity.
## 7. Troubleshooting Common Issues
* **No Sound:** Ensure the headset is selected as the default playback device.
* **Mic Not Working:** Check if the correct input device is chosen in sound settings.
* **Static or Lag:** Update your drivers and avoid interference if using wireless headsets.
## Conclusion
Connecting PC gaming headphones to your desktop or laptop is a straightforward process, but knowing the right method for your specific headset ensures the best results. Whether you’re using wired, USB, or wireless options, a proper setup guarantees immersive audio, seamless communication, and a competitive edge in every game you play.